Saturday, December 13, 2008

Chain Stitch Binding

Last night I experimented with a chain stitch for the first time post learning it in class. At first, it didn't go so well. But then I ended up with these and felt completely better.

12.13.08 050

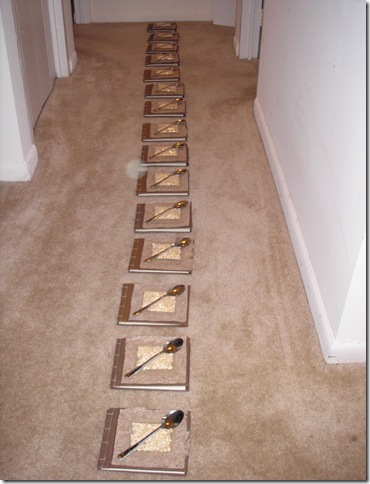
These books appear larger in the photograph than they are in real life. I actually cut an 8.5 by 11 sheet of paper into fourths, and they measure up to one of those fourths.

12.13.08 048

You can probably see the chain stitch better in these pictures. This is an exposed spine. They are connected with a stitching that I can only compare to knitting, though I don't know how accurate that is.

12.13.08 043

These papers were some leftovers from my friend Kate's mom. She was going to use them for Kate's wedding but ended up not. They are actually from Paper Source, one of the top stores for this sort of thing. This paper was actually pretty perfect for the covers. It was easy to glue, and there were no glue bubbles after I was done.

12.13.08 049

I will admit though, this chain stitch was a disaster the first and second time I tried. Luckily starting over isn't so bad. You basically cut out the string and begin again. It's very much like knitting in that way. The key to chain stitching (in my opinion) is making the stitch as tight as possible so the book doesn't fall apart.

12.13.08 046

I think these books will be great for general note taking, maybe for to-do lists or assignment books for students.

Final Outcome: I am really happy and can't wait to give them out as gifts. Though I will say that I need to spend a lot more time with the chain stitch to master it properly.

Tuesday, December 9, 2008

Swallow

It's done. It's finally finished! After weeks of cutting, gluing, sewing and printing, I present you with my book about oatmeal - Swallow.

Cat Weekend 141

Not only did I make one book. I made fifteen in total. Here they are, perfectly lined up in the one place where they'd all fit.

Cat Weekend 133

When you open the cover, you see the title page. This is a Micro-Fiction Oatmeal Cookbook made in 2008. They are about the size of a 5 by 7.

Cat Weekend 142

What's great about micro-fiction is that it takes a short story and condenses it into under 500 words. Each entry in my book looks something like this:

Cat Weekend 143

There is a corresponding photo and story. Each piece of micro-fiction is about a person and written in second person. For example, the first line of Peach Puzzle is this: "Parts of you didn't fit together."

Cat Weekend 144

Each bowl of oatmeal represents a person I've met. Sometimes the pictures are clear and very representative. Other times they are more abstract. In this entry, there is a bowl of oatmeal with a lemon slice on top. The corresponding story is about a friend of mine who loves all things lemon

Cat Weekend 145

The book is 24 pages long with an Author's Biography and Colophon at the end. A colophon is a list of all materials used to make the book.

Here's my list:

  • Binder board
  • Decorative paper
  • Cardstock
  • Ink
  • Hemp String
  • A Drill
  • Burlap
  • Plastic envelopes
  • Oats
  • Matte photos
  • Super glue
  • mod podge
  • hot glue
  • Spoon flattened by a hammer
  • Permanent marker

The back of the book is just one solid color.

Cat Weekend 146

You may notice that I spent a good amount of time working on the cover of the book.

Cat Weekend 151

I was really aiming for a layered look - the way that a bowl of oatmeal can be layered with different toppings and items. I used a bird's nest paper because I liked the texture. I then cut out squares of burlap - sort of like a placemat - and then placed a small bag of oats on top each book. I placed the oats in plastic bags to preserve them properly. I then affixed a spoon on top.

My experience in making these books took a lot of time and space. Here are some process photos that you may remember:

I individually cut each piece of paper and all the hardcover parts of the book.

11.21.08 034

My bedroom was a disaster.

11.21.08 035

11.21.08 036

11.21.08 045

11.21.08 046

Final Outcome:  I am more than happy with the way my books turned out. I think the writing is solid, and I think the pictures really add to the dimension of the book. I love the cover, and I'm glad I took the time to really figure out a layered look. I am also happy that I made a hardcover book, as that was something I aimed to do from the beginning.

Things I'd do differently: I printed photos and taped them into the book by hand. In the future, I would probably have these pages professionally printed (in color for the photos) and then cut. This would have saved me a good two hours worth of work.

Several of you have let me know that you're interested in one of these books.... for all of you who are interested, a special surprise is coming soon in the form of a contest. Keep your eyes open and keep reading the blog!

Monday, December 1, 2008

Time Check

Tonight in class we were all asked to bring in random materials - anything we could find, scraps of paper, etc. When we got into class, our professor had lined up enough paper bags for everyone. In each bag was an object; our goal was to create a book from that object and the scraps we had brought.

Here's a close-up of mine. Can you guess what it is?

12.1.08 075

12.1.08 078

Can't figure it out? Here's another hint.

12.1.08 080

It's a wrist watch book, but most people thought it looked like a corsage.

12.1.08 062

My object was a magnet that was curled up like a bracelet. I wanted to keep it in that form, so I covered it with burlap and then punched a hole through two layers. I inserted a wire that serves as the latch to the watch.

12.1.08 081

It looks ridiculous, I know. But the point was to experiment and have fun. On each panel I inserted a time that meant something to me.    

12.1.08 064

And on the other side, I wrote in some words that I associate with that time of day.

12.1.08 068

Final Outcome: This was a fun book to make while in class. If I had different materials, I would have made something to keep the "book" shut a little better. I basically just tied a string around it since that's all I had.

Would you consider this a book? It may not be traditional, but it still has a story to it, I think...

To check out the other books made in tonight's class, click here. They will soon be posted if they aren't already.

Saturday, November 8, 2008

Baby Shower Book

My friend Liz is having her baby shower today. In honor of the occasion, I decided to make her a journal using a signature stitch.Book 030

The front, back and spine of the book were made using Binder's board and decorative fabric paper (and of course mod podge). 

Book 015

The inside cover includes a colored piece of paper. I also attached a note for Liz that she can either glue inside this book or keep elsewhere. I wanted to give her the option.

Book 017

The inside pages were sewed together in panels using dental floss. They were then glued into the spine with hot glue.

Book 018

This is the colophon on the back cover of the book.

Book 020

The backside of the book.

Book 026

The back spread of the book.

Book 027

I hope she likes it. I will soon find out!     

Tuesday, October 28, 2008

Speak

One thing I always enjoy about my "art" is the sitting back and just taking a look at the finished piece. I am more of a product person than process. This translates well to my life as a writer, food artist/cook and public relations practitioner. I can certainly work hard to get somewhere - but I relish in what I've accomplished, despite the (sometimes challenging) journey it took to get there.

That being said, I have a final product I'm excited to share. Welcome to my midterm project in my bookmaking class: the newest journal out there - Speak.

10.28 046

This quarter's issue focused on food. What would your food say to you if it could speak? When opened, there is a note from me - the author, or rather Editor, of this publication.

10.28 047

Of course, this is a Lobster Books production.

10.28 049

Writers were asked to submit a picture along with what that food item would say to them if it could speak. Because this was cooking-related, I decided to opt for a recipe box that housed the separate submissions. (Here's what the inside looks like... sorry my color balance was off.)

10.28 050

Each serves as recipe card. Here is a sampling of the submissions I received.

10.28 059

After I selected a few entries, I put out an additional call for recipes. Therefore, each book contains a story, recipe and a section for notes. I decided to make these books using the matchbook form. Except that my books are horizontal matchbooks - rather than the traditional vertical style.

VERTICAL                                                      HORIZONTAL

10.28 068 10.28 067

Here's what the first page looks like. I'm using Kath Eats as an example, since she used her blog name.

10.28 063

Here's a sampling of the insides of the recipe books. I'm using an intentionally blurry picture for internet privacy purposes.

10.28 066

Final Outcome:  There are a few things I'd do differently with this project, and it all comes down to having time. I changed my mind about what I was going to do about a week ago - which only gave me a few solid days to do the legwork. If I had thought of this sooner, I would have:

  • Constructed my own recipe box using binder board
  • Included more submissions
  • Included blank matchbooks so readers could make their own

Special thanks to everyone who submitted to this project. Without you, it wouldn't have been possible.

Monday, September 29, 2008

Hardcover Journals

Front

9.29.08 023

Inside

9.29.08 024

Back Cover

9.29.08 025

Front (flat)

9.29.08 026

Binding

9.29.08 028

Sunday, September 28, 2008

Mixed Muffins Photo Book

You may remember the other day when I baked Cranberry Almond Fig Muffins? Using the pictures from that baking experience, I made a photo book for my class assignment.

Here are some of the materials I used:

9.28.08 038

I first printed out the photos I needed from the baking day and got to work making panels for the accordion. I used a heavy, almost cardboard like material and cut them into squares. I then covered the squares in white paper so they looked a little more attractive.

9.28.08 044

Instead of gluing the photos on first, I decided to make the accordion. I first tried sewing the panels together but they didn't link properly. I then decided to use thinner strips of the cardboard and some heavy duty super glue. I ended up liking the look of the accordion. I thought the cardboard strips would bother me, but I didn't think they looked too bad.

9.28.08 045

Do you see the cardboard sides of the accordion? I decided I would glue the photos on that side, so you could see each one as it popped up. I didn't realize until later that the white panels would be a little boring and just blank. So I pulled out some more ingredients materials, which will be featured later.

Ready for the final result? Here is a series of photos.

9.28.08 048

9.28.08 049

9.28.08 050

9.28.08 054

9.28.08 052

Did you notice the extra "materials"?   

As with other books I've made, there are always complications and happy accidents.

Complications: After I glued the photos to their appropriate panels, I was very discouraged by the white sides. I didn't intend on using food in this project (mainly because I don't know what will happen to it over time), and I only did this to cover up the spots. I think I should have glued back-to-back photos, but I didn't know how that would "read" as the accordion was stretched out. I thought about starting over, but I'd already spent a good amount of time on the book and wanted to finish.

Overall: I am happy with my idea and that I decided to go for it. Although this story may not seem to have layers, there are side stories that I hope viewers can see in the details. I was happy with my use of the plastic spoon as I think that makes the book more interactive. I intended on using a baking rack at first, but I liked the idea of the Tupperware because it could hold the story together, along with serving as the "end" of a muffin's story too.